In this tutorial we will explain how to send an invoice to a customer over email using Odoo. We will break this into three sections, which are:
# [[https://blog.laslabs.com/2015/10/using-odoo-sending-invoice-customer#giving-the-customer-portal-access|**Giving the Customer Portal Access**]] – Allowing the customer to have access to the customer portal so they can view their invoices.
# [[https://blog.laslabs.com/2015/10/using-odoo-sending-invoice-customer#verifying-the-invoice|**Verifying the Invoice**]] – Making sure that all sales orders are present and accurate for the invoice.
# [[https://blog.laslabs.com/2015/10/using-odoo-sending-invoice-customer#sending-email|**Sending by Email**]] – Sending the customer their invoice over email.
=Giving the Customer Portal Access=
* You first want to navigate to the customer’s account by searching for them in `Sales > Customers`.
* Click the “more” drop-down menu and select “Portal Access Management”.
** [[image:Screen-Shot-2015-10-26-at-1.26.21-PM.png|link=source]]
* In this section you want to check the box under `In Portal` (it will take two click to do this, one to select the line, and one to check the box).
** [[image:Screen-Shot-2015-10-26-at-4.48.14-PM.png|link=source]]
* You can also add text on the bottom, and that text will be included in the welcome email.
* Once this is completed click `Apply` and this customer will now be able to access their customer portal.
=Verifying the Invoice=
* Once you find your customer, focus on the group of buttons on the right side. The `Invoiced` button shows you the total amount that as able to be invoiced to the customer.
** [[image:Screen-Shot-2015-10-26-at-12.46.35-PM.png|link=source]]
* Clicking the `Invoiced` button will bring you to a table of all invoices for that customer.
** [[image:Screen-Shot-2015-10-26-at-12.46.54-PM.png|link=source]]
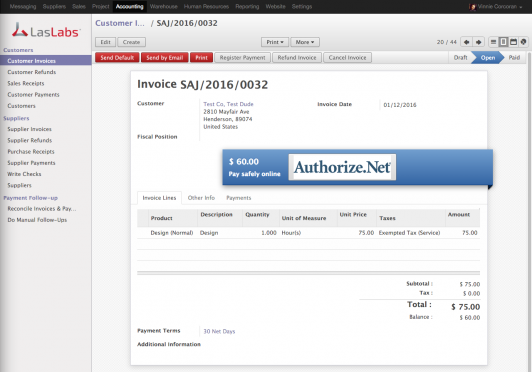
* If you click on an invoice in this table, you are brought to a more detailed view of the invoice.
** [[image:Screen-Shot-2015-10-26-at-1.13.55-PM.png|link=source]]
=Sending Email=
* While in the invoice you can click on “Send Email” to be taken top the email draft.
** [[image:Screen-Shot-2015-10-26-at-1.13.55-PM1.png|link=source]]
* A generic response will be generated for the customer automatically and presented for editing.
* You can also add any CC’s if needed in `Recipients` section.
* After you have verified that everything is correct with the draft click on `Send` and the invoice will be sent to the email that is on file for the customer.
** [[image:Screen-Shot-2015-10-26-at-1.47.03-PM1.png|link=source]]
Leave a Reply