In this module we will touch on how to Find a Delivery for a rental, Transfer the product from our stock, and then pick the bin for the product in Odoo.
We will be learning how to accomplish this in the “Sales”, section as well as the “Warehouse” section. We will be dividing this module into two sections that break down how we can achieve this goal in each.
[[[TOC]]]
= Sales =
Let’s start by finding our rental that we created by navigating to:
[[image:Screen-Shot-2015-08-11-at-6.08.04-PM.png|link=source| center]]
#Sales
#Rental
Once in the Rentals section, select the rental that you would like to work with. We are going to select the the one that is in the “Ordered” state, as this rental is still waiting to get sent out(pointed out in the above image).
[[image:Stock1.png|link=source| center]]
Once in the Rental’s details, we want to go down to the “Delivery” section where we will locate the “Outgoing Stock” option and click on the Rental’s Sales Order next to it.
[[image:Stock2.png|link=source| center]]
In this Rental, our product is not in stock and is “Awaiting Availability”. Your product should usually be in stock, but in case it is not, I wanted to show this option. If you select “Set Available”, the Rental will override any warehouse stocks and automatically set a product from your Pick. If there were indeed no items in stock, the amount will be negative (-) now.
[[image:Screen-Shot-2015-08-11-at-6.27.25-PM.png|link=source | center]]
Now our product is available and ready to deliver to the customer. All information is auto-populated from the sales order, so verify the information if you would like, then select “Process Entirely”
Our Rental is now sent out for delivery and is in possession of the customer.
Now, the rental is completed and it’s time to retrieve the item.
[[image:Stock4.png|link=source| center]]
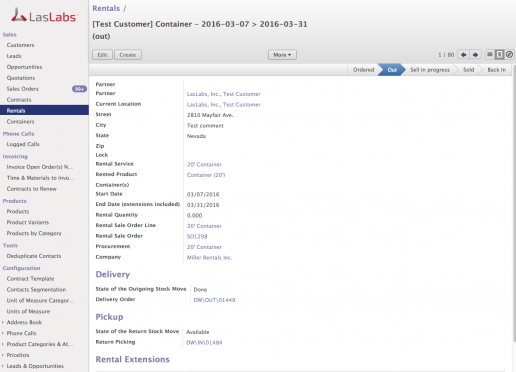
We’ll navigate back to the rental in Sales>Rental and select which rental we want to retrieve. You can see that the state of our rental is now “Out”, meaning it is out with the customer.
[[image:Stock5.png|link=source | center]]
Once in the rental details, we will go down to the “Return” section.
Now, under “Delivery”, the “state of the outgoing stock move” is “Done” since the rental is out, and under ‘Return it is labeled as “Available”.
Select the option next to “Return Stock Move” which will have our Sales Order number, followed by “Rental Out>Rental In”.
The next page will be the information for the return. The rental will automatically go back into the stock option that it was taken from, but if you would like to return it to a different stock, select “Edit” on the top of the screen, then adjust the location under “Destination Location”. Be sure to select “Save” if you edit anything on this page to continue.
[[image:Stock7.png|link=source | center]]
Once we’ve verified that all of the information is correct for the return, select “Process Entirely” and the return will be complete.
= Warehouse =
Now we are going to see how to do this same process in the Warehouse section. Find and select “Warehouse” in the top navigation bar.
[[image:Stock8.png|link=source | center]]
We are now in the All Operations section of Warehousing. In here we will see our warehouses and the different sections of them. We want to focus on the “Dewey” stocks for this rental, as that is where our item was picked from.
Our warehouses are divided into three sections- Receipts, Internal Transfers, and Delivery Orders. We are going to focus on the Delivery Order section.
[[image:Stock9.png|link=source | center]]
In our example, the sales order we are looking for is late and also awaiting availability. You can see that these are both noted in the Delivery orders section.
For our rental, we’ll click on “Waiting Availability” since our rental will be present there. You can also select “All Operations” and you will be taken to a list of all available transfers.
Once you find the rental we want to move, select it and you will be taken to the options to transfer it.
[[image:Stock10.png|link=source | center]]
Since our product is not in stock for our example, you will be asked to either “Check availability” or “Force Availability”. For this example we will be selecting “Force Availability”.
[[image:Stock11.png|link=source | center]]
Now that our stock is available, we can transfer the rental for delivery. Select the “Transfer” option and you will be taken to the “Enter Transfer Detail Options”
[[image:Screen-Shot-2015-08-12-at-2.02.03-PM.png|link=source | center]]
In here we can verify that all of our information for the transfer is correct, and once verified, select “Apply” and our delivery will be set as “Transferred”(see below)
[[image:Screen-Shot-2015-08-12-at-2.05.45-PM.png|link=source | center]]
Now we want to pick up our delivery through the Warehouse options. We will go back to Warehouse on the top navigation bar, but this time we want to focus on the ‘Receipts” section. Our rental is not late on returning, so we will be searching through “All Operations” for our example. You may use this same method, but can also look into “Late” and “Backorders” for whichever rental you need to return.
[[image:Screen-Shot-2015-08-12-at-2.10.31-PM.png|link=source | center]]
Once you find your rental that you want to return, go ahead and select it and you will be taken to the Transfer options. In here we want to select “Reverse Transfer” to bring it back into our stock.
[[image:Screen-Shot-2015-08-12-at-2.22.21-PM.png|link=source | center]]
Next, we want to specify the quantity of stock that will be returned to us and select “Return”.
[[image:Screen-Shot-2015-08-12-at-3.04.06-PM.png|link=source | center]]
Now we’ll be taken to the Returned Picking section to complete the transfer. Select your rental and “Force Availability” to make it transferable if needed.
[[image:Screen-Shot-2015-08-12-at-3.11.29-PM.png|link=source | center]]
Now that our product is ready to be transferred back to us, select “Transfer” and we will be taken to the “Product to Move” section.
[[image:Screen-Shot-2015-08-12-at-3.14.42-PM.png|link=source | center]]
Once in the “Product to Move” section, verify that everything is correct for our return and select “Apply”
[[image:Screen-Shot-2015-08-12-at-3.19.32-PM1.png|link=source | center]]
Our rental is now returned back into our stock and the rental is completed. In our next module we will point on how to Create a Contract for a Customer That Includes a Sales Order.
Note: If you receive any errors when transferring stock in the Warehouse section, please see group settings for the Warehouse User group by navigating to Settings>Groups>Warehouse/User>Access Rights. In this list find the “Picking wizard items” and make sure that the first three checks, Read Access, Write Access, and View Access, are all checked. You can do this by selecting “Edit” at the top of the page, making the selections, and then clicking “Save”
Leave a Reply