This tutorial will explain how to create a sales order for a rental in Odoo. We will break this into three sections, which are:
# **Starting the order** – We will open a new order and add all customer information.
# **Adding an item to the order** – Select the item and stipulations of the rental
# **Finalize invoice** – Verify that all items are correct and finalize the order.
[[[TOC]]]
= Starting the order =
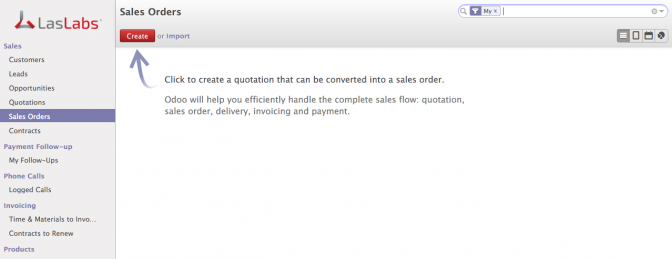
To open a new sales order you want to navigate to..
# Sales
# Sales Orders
# Create
* [[image:SalesOrder1.png|link=source|center]]
Once you click create you will be taken to the draft quotation for the sales order. This is where you will put all of the information related to the sales order, including
* [[image:SalesOrder2.png|link=source|center|large]]
# **Customer name** – Can be selected from a list of existing customers or create a new customer.
# **Invoice Address** – Will be auto-populated if the customer profile has an address attached to it. You can also select from a list of existing addresses or create a new address.
# **Delivery Address** – Like the invoice address, will be auto-populated if the customer profile has an address attached to it. You can also select from a list of existing addresses or create a new address.
# **Date** – Auto populated as the current date
# **Reference/Description** – Any special notes for the quote if needed
# **Warehouse** – Select the Warehouse from which the rental is coming from.
# **Pricelist** – Select the price list you want the rental cost to follow (normal, discount or any other listings you may have for your products)
# **Default Start/End Date** – Start and end date that is estimated for the rental
=Adding an Item to the Order=
Next you want to add the item that is being rented into the quote. You can do this by selecting the “Add an Item” option under Order Lines. In here we will create the order line for the item that is being rented. Select the…
* [[image:SalesOrderItemComplete.png|link=source|center|large]]
# **Product** – Select a service product that can be used as a rental.
# **Quantity** – Since this is a rental, the quantity will be in days and not units. Select the amount of day the rental is for.
# **Unit Price** – The amount per day that the cost of the product will be. This will be auto-populated to whatever rices is specified on the product profile.
# **Discount** – If you would like to discount the order, select a percentage you want the per unit(day) cost to be discounted.
# **Taxes** – The amount of taxes you want taken out of the sale.
# **Delivery Lead Time** – The amount of time between order and delivery of rental item.
# **Weight** – This is auto-populated to whatever weight is specified in the item profile.
# **Allotment Partner** – Used with multiple items that go to different address on one quote. Will most likely not be used for rentals.
# **Description** – Any notes that may be needed for the item. This will be seen on the order line in the sales order quote.
After filling in all of the information for the order line, click Save & Close on the bottom and you’ll be taken back to the sale order quote. We can now see our item under order line.
* [[image:Salesorderafteritemadd.png|link=source|center|large]]
If you would like to select them, there are more options under the “Other Information” tab in the quote. This includes things like tags for searching, information on the lead from which the sale came from under Campaign and Channel, and other options that you may want included on the quote.
* [[image:SalesOrderotherInfo.png|link=source|center|large]]
If you would like to calculate the shipping cost into the quote at this time, you can do so by selecting it in the “Delivery Method” section and choosing “Add in Quote”. If it is not added at this time, it will be computed when invoicing based on delivery order(s).
Once you have added all of your items into the quote, you can calculate the total cost by selecting “Update” next to the total towards to bottom of the quote. After verifying everything is correct you can either e-mail the order, or save it is a printable PDF version.
* [[image:SalesorderUpdate.png|link=source|center|large]]
Now that all of our information for the order is filled out, we can click “Confirm Sale” on the top of the page to complete the quote.
=Create/Finalize Invoice=
If you would like to invoice this order directly, you can click the “Create Invoice” button at the top of the page.
Next you can choose from different invoicing options. With a rental, you will usually invoice the whole sale order, but if the situation calls for it you can also choose to advance a percentage or certain amount of the invoice, or a specific some of the order lines. Once selected click “Create and View Invoice”.
* [[image:InvoiceOrder.png|link=source|center|large]]
Here in the Invoice Draft we can review everything once more if needed, then click “Validate” in the top-left.
* [[image:Validate.png|link=source|center|large]]
Now our invoice is open and the rental is almost complete. If the rental has gone as planned and the payment is processed, you want to register the payment in the invoice.
We’ll do this by selecting the option on top and filling out the Pay Invoice. You have the ability to do a partial payment, but you will usually process the entire amount. Once completed click “Register Payment” and the invoice will be completed.
In our next module we’ll touch on Finding delivery/pickup order for a rental to return the stock into our inventory once the rental is completed.
Leave a Reply